


Excel stands for Visual Basic for VBA Applications. A built-in language for Microsoft office applications. The purpose of this application is to automate a task that requires manual effort while working in Excel. Using Excel VBA Code will automate this process and make it easier and quicker.
We will create a Macro and then run that macro in the Visual Basic Editor is what Visual Basic does for the application. So let’s see what the Visual Basic Editor looks like? How do you create a macro in Excel? And run those marks in the Visual Basic Editor.
When you have to do tasks that require repetition, you need to create a Macro. This will ultimately help you save your time and effort. Once you develop Macro, you can save Macro and use it multiple times.
What is a macro? A macro is an action that is performed to run action as many times as you want.
This tutorial will explain how you can create Macro in Excel. Even non-programmers will be able to create Macro by following the steps below. But before we look at the steps, remember these few essential tips:
1. Always keep Macro names short compared to identification, it becomes very easy.
2. Macro names must begin with a letter and cannot contain space, symbols, and punctuation marks.
3. The maximum length of the name can be 80 characters.
4. Use relative cell addresses
5. Always start your macro at a home position which means cell A1
6. Always navigate through the directional keys from the keyboard as navigation becomes easier, avoid using the mouse for navigation to select and click menu options.
7. Always keep the Macro as small as possible. The larger the macros, the longer it will take to run the macro.
8. Small Macro can help you detect failure easily taken by Big macro.
The steps to create Macro in Excel are divided into 4 parts. The first part tells you to turn on the Developer Tab. The second part tells you to place the Command Button. The third part is to assign to Macro. The fourth view is to open the Visual Basic Editor.
1st part: Enable Developer Tab – Excel VBA in Hindi
There are two ways to turn on the Developer Tab. Both ways to start Developer Tab are described below.
Step 1: Right-click anywhere on the ribbon and click Customize Ribbon
Step 2: Insert a check on the developer’s box to the right of the Excel Options dialog box in the main tab options. And click OK.
Result: After doing either way you will see the Developer tab to the right of the View tab.
2nd Part: Place a Command Button in the Worksheet. – Excel VBA in Hindi
Now, we insert the command button on the worksheet. The steps to place a command button in a worksheet are as follows:
Step 1: Click on the Developer tab.
Step 2: Click Insert in the Controls group.
Step 3: From the drop-down menu of Insert, click the command button in the active X control
Step 4: Drag the mouse into the worksheet. The larger the command button drag, the larger it takes. In short, you can customize the size of your command button.
Result: A command button 1 appears at the location where you drew your mouse. We have changed the caption of the command button on ClickMe.
3rd Part: Assign a Macro to the Command Button 1 – Excel VBA in Hindi
After inserting the Command Button we have to Assign the Code to run the Command Button. For this, we need to create a macro and assign the command button. The steps to create and assign a macro are as follows:
Step 1: Click the command button and activate the design mode in the control groups of the Developer tab.
Step 2: Right-click on the command button and click on View Code.
Step 3: Visual Basic Editor opens.
Step 4: Place the cursor between the Private Sub CommandButton1_Click() and End Sub.
Step 5: Add the Code line or Lines you want to run. In our example, we enter the line Range(“A1:A5”). Value = “Become an Excel Superstar”
Step 6: Close the Visual Basic Editor and now click on Command Button 1 which is a spreadsheet.
Result: Woo!!! You have created a macro in Excel. Wasn’t it easy?
4th Part: Open Visual Basic Editor – Excel VBA in Hindi
The Visual Basic Editor is a part of Excel VBA where you will insert the code to run the command. The steps to open Visual Basic Editor in Excel are as follows:
Step 1: Go to the Developers Tab > Click on the Visual Basic in the Code Group.
Step 2: Press the shortcut ALT + F11 to open the Visual Basic Editor.
Result: Visual Basic Editor pops up.
Result: Woo!!! You have created a macro in Excel. Wasn’t it easy?
Now let us see the details of the Visual Basic Editor
Visual Basic Editor has three windows. The first is the project window. The second is the code window and the third is the properties window.
1st Part: The projector window is located to the left of the Visual Basic Editor dialog box. This is a place where all open workbooks are located. The VBA project window is divided into 3 different types of modules. The module is where all the code will be stored. CTRL + R is the shortcut to navigate in the projector window with the help of the keyboard.
2nd Part: The Code Window view is the white area to the right of the Basic Editor. This is where 90% of VBA work is done. We can test, develop, and modify macros.
3rd Part: The property window is located below the projector window. This window shows you the properties of the selected components in the project window. F4 is a shortcut to open Properties windows and edit and move in Properties windows.
Record a Macro
Macro Recorder allows you to record tasks performed in Excel VBA Code. Even if you do not have the code and you record a process that creates a series of actions in the macro recorder.
Macro recording is easy. The steps to record a macro are as follows:
Step 1: Go to the developer’s tab> click on record macros in the code group
Step 2: Name the macro and give a shortcut of your choice. (The name should be such that you can easily remember in case of shortcut)
In the example, we wrote the name as the brand name, and the shortcut is used Ctrl + E.
Step 3: Click OK and continue your action
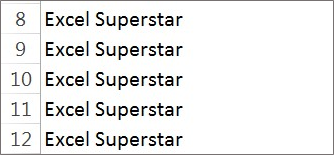
Here we have written our brand name i.e. Excel Superstar for the category A8: A12.
Step 4: Click Stop Recording after you are done with your tasks.
Run a Macro
After recording the macro while looking in the record macro. Now you can run the recorded macro. We will run the same macro that we recorded in the record macro. We will follow the steps to run the macro:
Step 1: Go to the Developer tab> click Macros.
Step 2: The Macro dialog box opens where you can see the name of the recorded macro. Click on the macro name, and then click Run.
Result: You will see that the macro you entered earlier is now seen in another worksheet. We previously recorded our brand name Excel Superstar. So, when I move to the next sheet in this workbook and complete the above two steps I get the result that appears below:
This tutorial explained to you how you can create a macro, run the macro created in the same workbook. This is basic knowledge, to begin with learning Excel VBA. Read more blogs to gain deeper knowledge and start your coding.