MS Excel in Hindi is a software designed and manufactured by Microsoft. It’s a Spreadsheet that contains the number of Rows and Columns. MS Excel in Hindi helps us provide data in a tabular form. MS Excel helps us organize, store, and analyze data. The tabular format helps in proper classification and provides a holistic view of the data.
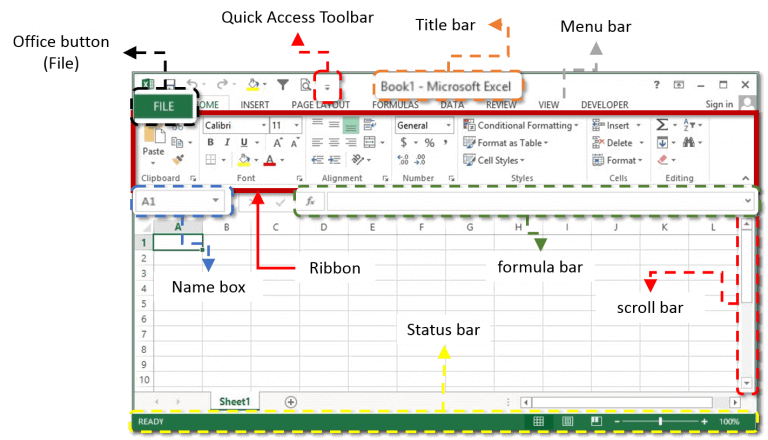
Table of Contents
What is MS Excel in Hindi? | MS Excel क्या है?
MS Excel helps us to accomplish various tasks such as Editing, Formatting, Tabulation, Storing, Formulating, Charting, Printing, Consolidating, Grouping, and Ungrouping, Communicating, and many more. MS Excel is a widely used software because its various functions are available in a single software.
When you open MS Excel, you can see that there are many operations in MS Excel, so we study all the functions in detail.
File (Office Button)
The File or Office button is located on the top left corner of your screen. This button provides various options like new, open, save, save as, print, share, export, close, etc. There is nothing to know about the file button. This is the basic operation which is common for all other software like MS Word, MS PowerPoint

When you click on New, it will help you open a new spreadsheet. The excel shortcuts key is Ctrl + N to open a new spreadsheet.
When you click open, it will ask you to open the files you have previously saved. The excel shortcuts key is Ctrl + O to open the saved file.
When you click save, it helps to save your spreadsheet to your device. The excel shortcuts key to saving the current file is Ctrl + S
When you click on this save as it helps to save the spreadsheet in your required space.
When you click Print, you will print the Spreadsheet that you want it to be as a hardcopy. excel shortcuts Ctrl + P to print spreadsheet
When you click on Share, it will share the Spreadsheet via e-mail and cloud.
When you click Export, it will help to export the spreadsheet in PDF (Portable Document Format) or XPS (XML Paper Specification).
When you click Close, it will help you close the spreadsheet or close MS Excel. If you have not saved the document or spreadsheet, it will ask you whether to save the content or not to save any Also by clicking on the operation you will come out of MS Excel. Another way to close is to click on the top right corner of the screen which shows “x”
VBA Codes for Example no. 1 https://youtu.be/X922Pcu0Ixs Download Practice Files VBA Codes for Example no. 2 VBA Codes for Example no. 3
In this blog, we will learn about VLOOKUP Formula in Excel How to use VLOOKUP in Excel? I have a table consists of 4 students
Quick Access Toolbar
The Quick Access Toolbar is located at the title of the spreadsheet. Quick access toolbar helps in getting quick views of various tasks. Typically the Quick access toolbar displays operations with saving, undo and redo.

The undo function allows the last action to be undone. The operation from Redo helps to perform the previous performance with Redo which we did earlier. We can also customize our Quick Access toolbar by clicking on the small down arrow button on the title bar.
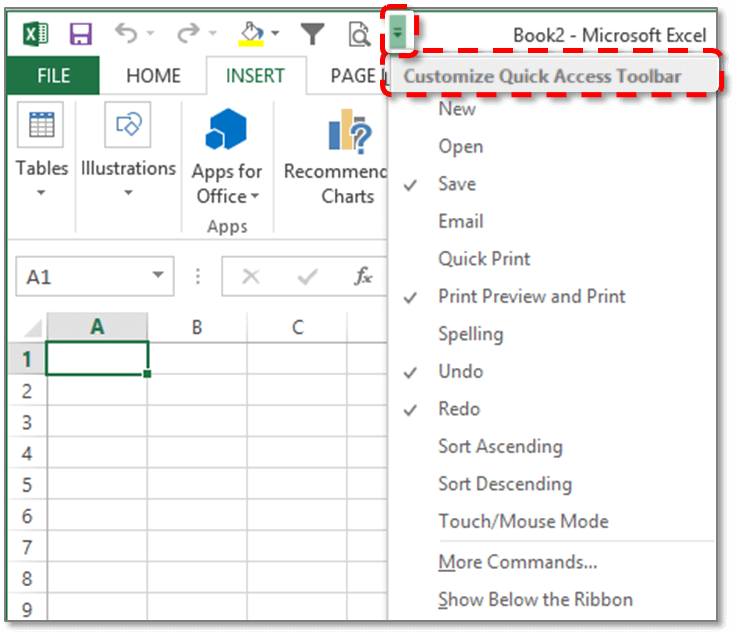
By clicking on that button you can customize your toolbar, it will show various options like New, open, save, email, quick print, print preview and print, spelling, undo, redo, short ascending, short descending, under the ribbon. And etc. The quick access toolbar helps you get things done faster and faster. The quick access toolbar is the same for MS Word and MS PowerPoint.
How to add a tool to Quick Access Toolbar?
When you want to add a tool to the quick access toolbar, right-click the mouse and click Add in the quick access toolbar.
How to remove a tool from Quick Access Toolbar?
When you want to remove any tool from the quick access toolbar, click on the mouse and click Remove from the toolbar and add a new tool that you want to add to a quick access toolbar.
Menu Bar
The menu bar is at the top of the worksheet, above the title bar and the Ribbon Display option. The operations in the menu bar are as follows: File, Home, Insert, Page layout, formulas, Data, review, View. Each operation has its own ribbon. You can select the operation with the mouse by clicking on the respective operation.

You can also do this with the help of keyboard shortcuts. When you press the ALT button on the keyboard it will take you to the menu bar and after that, you can select with the help of arrows. There will be slight differences between the menu bar of Microsoft Word and Microsoft PowerPoint.
Ribbon
The ribbon that appears below the Ribbon menu bar is also a part of MS Excel. The ribbon menu system is how you plan through MS Excel and enter various Excel commands. Details of different ribbons will be provided separately.
Name Box

The Name Box is the box that is located on the left side below the Ribbon bar. And on the left side of the formula bar, it is also above the worksheet area. The size of the name box can also be customized. You need to catch the left click of the mouse and move the mouse sideways. The name box displays the name of the cell selected.
Formula Bar

The Formula bar is at the top of the worksheet. It is on the right of the Name box and below the Ribbon. The formula bar is denoted by “fx”. We activate the formula bar by typing equal to the “=” sign. If the formula bar is not visible in your worksheet, then you have to follow these 3 steps
Step 1: Click on the File menu
Step 2: Click Options at the end of the list
Step 3: Click Advanced per then scroll down to display and click on show formula bar
Status Bar
The Status bar is at the bottom of the spreadsheet. Through the status bar, we can get a quick view of the count, average, minimum, maximum, or sum of selected cells. You can customize your status bar by right-clicking on the status bar.

The status bar usually shows a zoom in and zoom out. You can zoom in and out of the spreadsheet, The status toolbar contains various tools such as caps lock, nom lock, scroll lock, cell mode, signature, etc. The status bar is the same for Microsoft Word and Microsoft PowerPoint
Scroll Bar
Spread worksheets have two scroll bars, one is a horizontal scroll bar and the other is a vertical scroll bar. The horizontal scrollbar is on the top right of the spreadsheet and the vertical scroll bar is on the right side of the spreadsheet. You can also hide the scroll bar by completing the following steps.
Step 1: Click on the File menu
Step 2: Click on Options
Step 3: Click on Advanced and then go to Display Options for this worksheet
Step 4: Click on the box that shows > Show horizontal scroll bar > Show vertical scroll bar
Text Area
The Text Area is the most important part of MS Excel, it is the center of the spreadsheet. You enter text in this part of the field


Leave a Reply