Did you forget your Worksheet password? Do you want to crack open a protected sheet’s password? Our #GodMode hack will teach you how to remove password from Excel with just a simple Notepad.
Remove password from Excel tutorial is a God Mode Tutorial. This tutorial will explain how you can unlock a sheet that is protected but without using a Password. We protect a full sheet or either few cells of the sheet so as to avoid changes that can be made by others when you share the file with other employees.
There is no way we can recover or view a password that we have lost. We add a password to our sheet so as to avoid other users from either deliberately or accidentally make changes in the sheet or also moving or deleting any cells in the worksheet.
Some of the cells are protected so that people cannot add or modify or delete anything in those cells. Only certain cells of the sheet can be edited. Sometimes we also need to break the password because we forgot what password we had kept.
There is no option in Excel to reset the password like Gmail and other accounts have. We compulsory need to break the password if we don’t remember the password.
So what will you do? Generally, you will search in google and it will direct you to 100 sites asking you to download some software to break the password. So if you want to continue you can. But don’t you feel it is not a worthwhile effort as it may or may not help you.
The method or the step that will be explained by me will surely work in any of your devices. This is the best Trick and so I have named it as “GOD MODE”. Before you remove the password from excel you need to look into our earlier blog regarding how to protect your sheet.
Let’s look at how you can remove the password from Excel without using a password. We have divided the steps into two parts. 1st part shows you how to enable the extension name display option and the 2nd part shows how to Remove Password from Excel.
Part 1: Enable Extension name display option
Step 1: Go to the Control Panel and search for Folder Option.
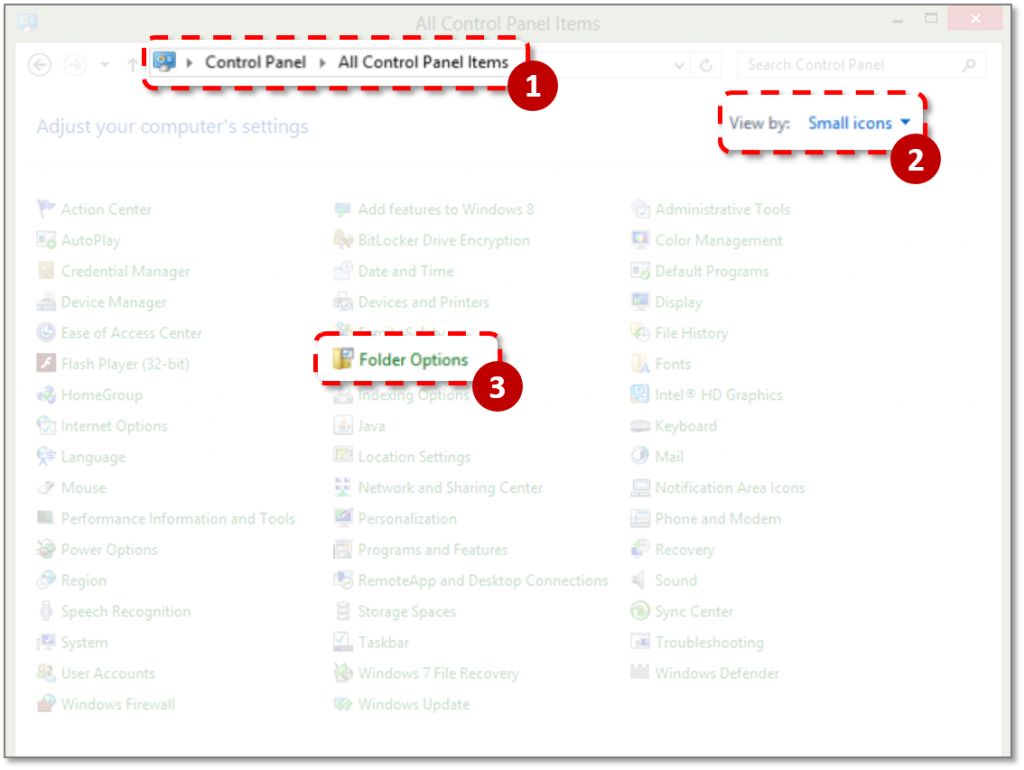
Step 2: Folder Options Dialog box opens up. Go to the View Tab in the Folder Option. Untick on hiding Extension for known file types. Click OK
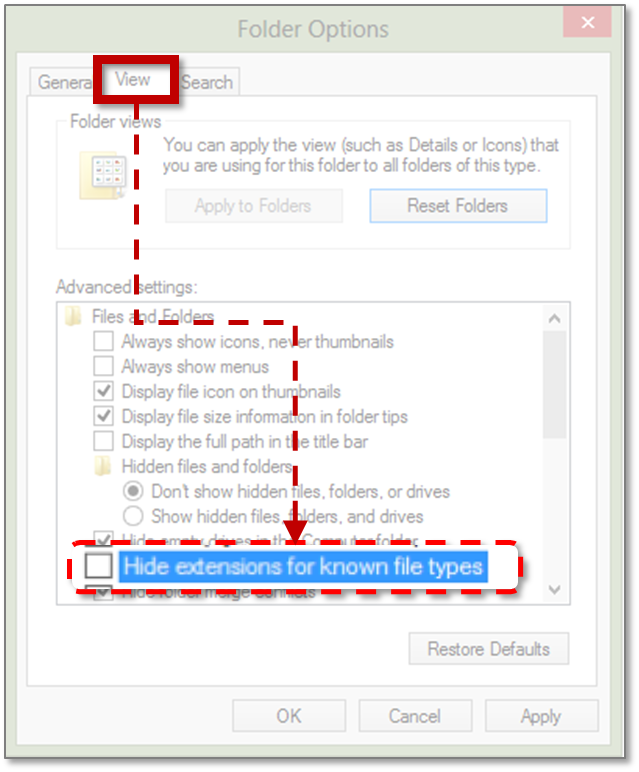
If this option is ticked you won’t see any extension name of the file after the File Name. After we open an Excel document and try to make changes in the cell we get the following notification.
The cell is protected and we cannot make changes to the worksheet.
Part 2: Remove password from Excel
Step 1: Edit the File Extension name. Right Click on the file and click on Rename. Here change the extension name from “xlsx” to “zip”
Step 2: Open the zip file. You see a lot of Folders. Click on the “xl” folder.
Step 3: Again you see a lot of folders. Click on the “WORKSHEET” function.
Step 4: You will see 2 sheets with “XML” files. Sheet 1 & Sheet 2 which were in the protected sheet. Extract both the sheet into the folder.
Step 5: We need to open the Extracted file with Notepad. So right-click on the sheet and select Open With > Notepad
Step 6: Search the word Protection By using the Shortcut CTRL + F. Type Protect in Find what and click on Find Next. You need to do this as there is a lot of coding inside it.
Step 7: It will take you to the word protection. Remove the tag from the notepad.
Note: Do not remove extra tags. Remove the tags starting from “<” and ending at “>”
Step 8: Close the Notepad will ask you to save. Click on Save.
Step 9: Now, we need to drag the sheet which we extracted back to the zip file.
Step 10: It will ask whether you want to add the file. Click OK and Close the zip file.
Step 11: Rename the file from “Zip” to “xlsx”. Click on Yes as it asks you whether you want to change the file extension name.
Step 12: Open the file and now you can see that you can change in the protected cells.
Wahoo! Wasn’t it really amazing? You could unprotect your sheet by following a few steps. Remember that this is a very secretive trick. If you share this trick with everyone people can unprotect your sheet too. Learn such amazing tricks and become an Excel Superstar by being with us. Looking forward to you in the next blog!




Leave a Reply